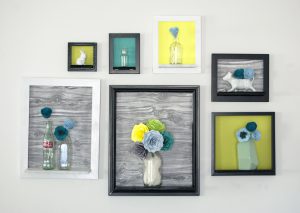
In case you missed it, last week we built a bright and springy picture frame shelf statement wall perfect for showcasing a collection! It could work for any small objects, but today I’m sharing some tips for arranging and personalizing one of my favorite collectables: glassware.

For some reason, when I’m out thrifting, I’m often drawn to cute bottles or ceramic figurines that until recently had just been taking up space in my kitchen cabinets. But during a recent spring cleaning rampage, I pulled these pieces out and decided to give them a new home on my wall! Collections don’t do anyone any good if they’re tucked away taking up space, so now that the picture frame shelves have been built and installed, it’s time to focus on showing off my glassware collection.
I laid out the pieces that needed a home and asked myself first if they looked good together. I donated a couple that I could part with and didn’t really fit, and then I thought about how to make the rest feel more cohesive. One of the easiest ways to make thrifted items with very different styles feel like a unit is through one uniting color scheme. So, a couple of them got a paint job.
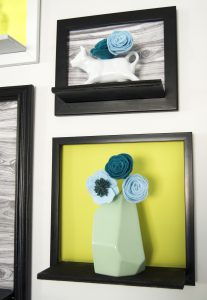
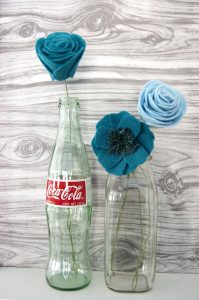
The cute little bunny had hand-painted features when he originally came home with me, but for him to match my cow, he needed a glossy white finish. A little spray paint made for an easy upgrade! To balance the wall with another “white” bottle, I stuffed the milk bottle with tissue paper. This is a great option for clear glass, especially if you don’t want to permanently change it. You could use tissue paper in any color to match your home’s mood! After that, I thought complementary backgrounds and flowers of the same color would unite the rest.
If the integrity of your pieces would diminish with a paintjob, you could arrange them in a gradient or rainbow order. Just tricking the eye into seeing some color cohesion is a great way to keep a collection from looking cluttered or disjointed. You could also pull a couple of dominant colors from individual pieces and use those as the backgrounds to spread distinct hues around the display.

Once you’re ready to start placing them on your picture frame shelves, begin with just one item on each shelf. If it looks too sparse, layer in more objects with different heights. As you place each piece, think about how it interacts with the rest of the wall. For example, my white cow, bunny, and stuffed white milk bottle are intentionally spread out. The mint colored geometric vase and green-tinged coke bottle are purposely on opposite sides, too. With the flowers, I placed the bulkiest looking bouquet front and center to keep the wall display grounded. The smallest frames and objects are on top for visual balance.
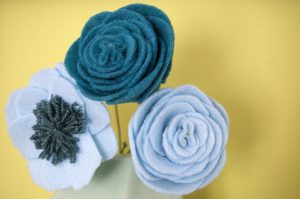
I decided on flowers for the accents because glassware is so fragile and static looking. Faux plants create the illusion of life and further emphasize my color scheme. Want to make some felt flowers to customize your home or collection display? Here’s how…
I always find the most unique additions to my home decor (like these dining chairs!) when I shop at Goodwill®, but that’s just one of the perks. In 2016, more than 313,000 people in the United States and Canada connected with jobs or earned employment using Goodwill organizations’ career services programs, so I love supporting the organization for that reason, too. Now that my glassware officially has a home, when I’m out thrifting, I’ll be able to imagine how new pieces will integrate into my statement wall.