Is there anyone on your holiday shopping list who has recently moved? Anyone young and just starting out on their own? Any new marriages to celebrate or roommates you appreciate? A cozy kitchen kit might be just the right customizable gift idea to brighten their holiday season. The best part, other than knowing that your purchase helps Goodwill to create job training programs that meet the needs of local employers in high-growth industries, is that you can completely personalize the gift bundle especially for your pal. Here are a few tips for putting together the perfect little package.
Tip 1: Include items that you know they don’t have or will definitely use.
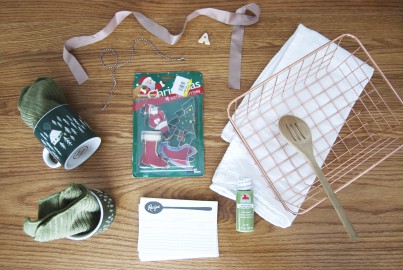
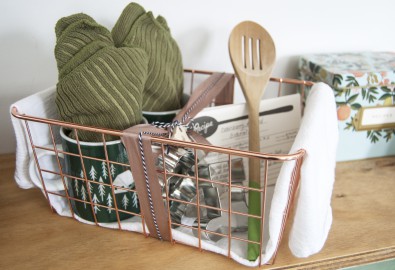
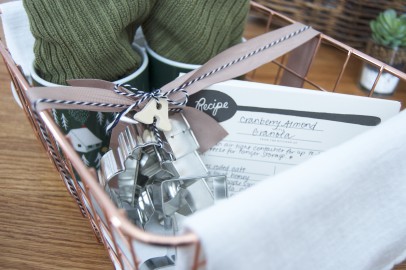
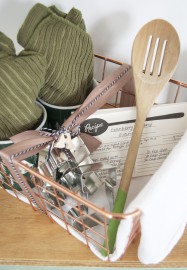
Above is my thrift haul for the kit I put together! I always love cooking with wooden spoons for their versatility and look, so that was at the top of my list of things to include. Tea towels are another one of those items that no one can do without, so I made sure to grab some of those. Since it’s almost Christmas, I also tossed in some cookie cutters that my local Goodwill was selling in their original packaging for only a dollar! These are all pieces that my friend either doesn’t have or can definitely use more of, so I know they’ll be put to good use.
Tip 2: Share recipes that regularly warm up your own kitchen.
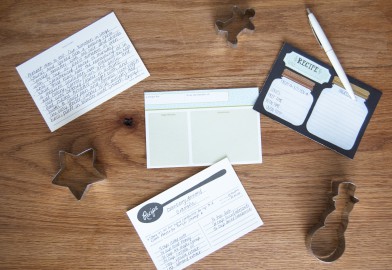
This is the really special part of the kit: including your own favorite recipes. If you have recipe cards or if you thrifted a recipe box, perfect! If not, you can always use regular index cards instead. Take some time to comb through your own cookbooks and kitchen notes to pass on the gift of your favorite foods. Good smells and full tummies are really the best way to guarantee a cozy kitchen, after all. You could even crowd-source traditional family foods from friends you have in common to further enhance the gift. The more you add, the better it gets!
Tip 3: Look in every section for the best box or basket.
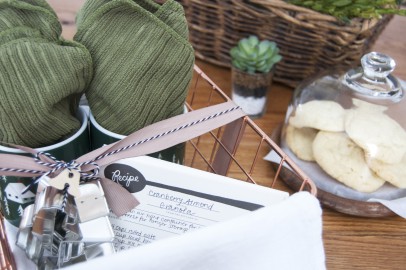
You’ll need to make sure the item that contains your gift set is the right size to hold everything, so it might be helpful for you to know what you’re giving before you select the container. My first hope was to package everything for my kit inside or tied atop a recipe box until my eyes fell on this beautiful copper basket. It was actually being used as a display for sewing patterns at my local Goodwill, but when I turned it over there was a price tag — score! In the end, this actually worked way better than the recipe box since it’s large and sturdy enough to fit two cute mugs.
Tip 4: Customize colors to match their kitchen.

Look for kitchen goodies that match your recipient’s decor scheme. Think of any neutral items, like this wooden spoon, as a blank canvas. It’s easy to coordinate mismatched Goodwill finds when you tie them together with one color. And dip-dying utensils couldn’t be easier! Just find a non-toxic or food-safe paint for your accent color.
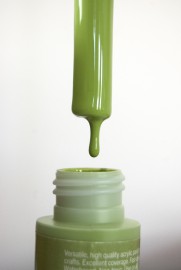
To add a fresh apple green handle to my wooden spoon, I first hung the spoon up somewhere safe and out of the way. You can use string, a twisty tie, or even a binder clip to dangle your utensil with the handle-side down. Place newspaper under the spoon to catch any drips, then just dip the whole handle into a bottle of non-toxic paint. Read the directions to find out how much time it usually takes to dry. Keep in mind that since the paint is going on thick, it will need more time than the directions indicate. I let mine hang for 24 hours before even touching it.

You won’t want to paint directly on any areas that will touch food, but utensil handles, the sides of a cutting board, or the outside of a bowl are all great places to add some color. They’ll also need to be hand-washed to keep them in good condition for many years to come. Try dipping your handle straight down or tilt the bottle a little for an angled line at the top of the paint! You could take it a step further by writing a cute phrase or a family name over the paint in fancy script. If you go for their name, this could even take the place of a gift tag!
Tip 5: Use items from the kit in the wrapping.
If I had gone with the recipe box, I would have used a rolled up tea towel instead of a ribbon and bow, then tied that around the wooden spoon right on top. But because I found bigger items that I knew my friend would use, I instead tied the cookie cutters so they were dangling off of the bow. Think about ways you can use the necessities inside your kit to act in place of wrapping paper, a bow or ribbon. It’s a fun and completely on-theme arrangement for the gift!
This is such an easy way to find something special for the people on your list this holiday season. With the personal touches like favorite recipes and hand-painted accents, they are sure to appreciate your thoughtfulness. Plus, every time each item is used to stir, simmer, or sift, you’ll warm up their cozy kitchen all over again. Enjoy this season of giving, my friends!