Celebrate Halloween and #ZombieWeek by creating a DIY ‘Zombie Cooler’. Give your thrift find a spooky upgrade in just a few steps!
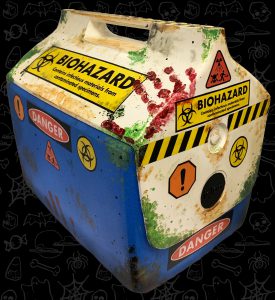
- Start with a few fun ‘Biohazard’ print outs (zombie-cooler print). Cut up your selected collection of warnings and start thinking about your layout.

- Apply your printed designs with dishwasher-safe Mod Podge® (for added moisture durability). Once the design is adhered, brush on an additional layer of Mod Podge to secure in place.
Make sure you cover the edges well. Use extra coats if needed. Smooth as you go.
- Continue to add stickers to your cooler using this method of layering Mod Podge both under and on top of your warning labels.
- Once your cooler is fully labeled, it’s time to paint! Choose a few grungy colors to add some dirt, grime and spatter to your surface. Have fun with your options, a few gross details don’t hurt! Fingerprints, mold, slime, smears, drips… it’s all fair game.
- Once you’re happy with your grunge, seal everything in with an extra layer of Mod Podge and allow to dry.


Your zombie cooler is ready! Perfect for storing candy for your kiddos during your Zoom Halloween party with friends. 🙂