Let’s just call this the year I finally build the bedroom of my dreams! For spring, I fixed up the nook of our room where the bed resides (it felt so good!), but there’s one other thing that has always bugged me about this space and summer has finally brought its solution. I’m not sure why the previous owners put in a sliding glass door—to nowhere—that angles out so that both our neighbors and the busy road we live on have a great view right into the room. Maybe they had plans to add on a deck from the bedroom? Whatever the reasoning was, since day one we’ve basically treated it like a wall, for privacy’s sake, by hanging thick black-out curtains.
With those curtains, though, came the cave-like feeling that left us uninspired to decorate…until this year. Now, summer’s got a grasp on me and I can’t block out those daytime rays anymore! So, to Goodwill I went for supplies to build this breezy privacy screen.
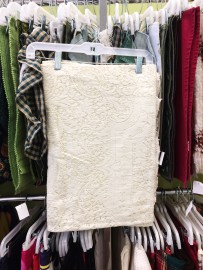
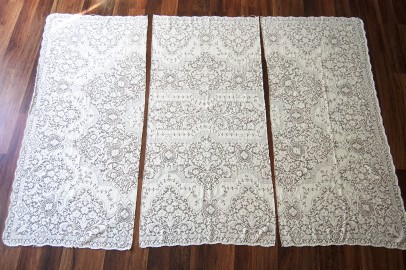
I’ve seen lacy cloth at Goodwill many times in the past and was hoping there would be some on the day I went thrifting for this project. To my delight, there was! This gorgeous tablecloth was about to get its day in the sun—literally. I’m so happy I found this exact one, but if I hadn’t, I probably would have chosen a light-colored vintage floral or, for a cottage feel, gingham checks! Since for this project you’re building the frame yourself, you can work around the size of the fabric that you like best. Look for long curtains, tablecloths, or bed sheets for the most yardage if you decide to make your own room divider.
At Goodwill, I also found one roll of butcher’s string which I knew would get me started on the macramé I envisioned across the top and bottom of the screen. You may not find enough of just one kind of string to do the whole project, but if you look carefully you’ll notice that I actually used two different types of cord on the middle panel. No biggie! Just alternate the different cords to make a symmetrical pattern! Any little bit of material that you can buy in our stores helps Goodwill organizations provide job preparation, skills training, education assistance and support services to millions of people each year who are facing challenges to finding employment. You’re making a difference!
This is kind of a big project, so I’m going to break it down into three parts. It has a lot of steps and won’t come together as quickly as my other projects, but it is totally worth the time investment. I’ve only had this screen up in my house for a week, but I’ve already gotten a ton of “You MADE that?!” comments from visitors and friends I’ve shown pictures to. Plus, there is something so soothing about doing this super easy knot over and over again! Macramé is its own type of therapy.

Materials:
Part 1 – Building the frame (Adjust your measurements if necessary.)
- (6) pieces of 6’ x 1 ½” x ¾” wood for the sides
- (6) pieces of 2’ x 1 ½” x ¾”wood for the horizontal slats
- (6) 25 ½” long x ½” thick dowels (you may have to cut these from longer dowels)
- Wood glue
- Screws
- Power drill
- ½” spade or forstner bit
- Pencil
- Measuring tape
- (4-6) hinges with accompanying screws
- Your choice of stain or paint
- Clamps (optional)
Part 2 – Doing the macramé
- Macramé cord or similar string (I needed about 100 yards, but that could vary.)
- Scissors
Part 3 – Cutting and attaching the cloth
- Fabric (Enough to cover the open area of your panels. Remember that you can adjust the size of the panels to fit your fabric if necessary.)
- Scissors
- Straight pins
- Marking tool
- Measuring tool
- Sewing machine or Fray Check seam sealant
- Clothespins
- Tapestry needle
- Sturdy thread
Part 1 – Building the frame
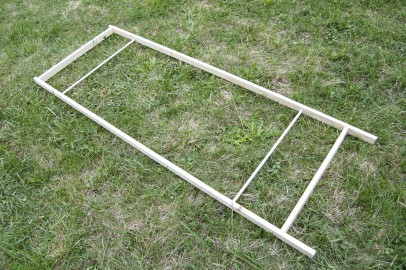
Step 1: Decide the scale of your frame either by the size of the space you need to cover or the width of the fabric you have. Above is the basic shape your frame will need to be, but the exact measurements can fluctuate based on your needs. Lay everything out to make sure the sizing of the wood and fabric all work before you make any cuts.
Step 2: Make your precise measurements and mark the wood where you’ll be drilling the holes for the dowels and where you’re going to be attaching the horizontal slats.
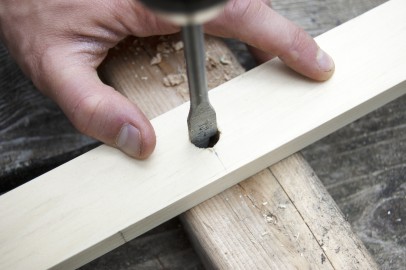
Step 3: With scrap wood behind the vertical slats, drill the 12 holes for your dowels.
Step 4: Drill pilot holes then start the screws that will hold the top and bottom slats of each panel in place.
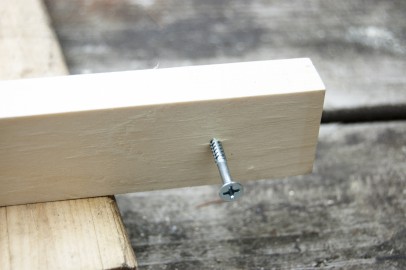
Step 5: One piece at a time, add wood glue to both ends of the wood that will become the top and bottom slats of each panel then immediately put them into place. Clamp them or have a friend help hold them steady while you finish screwing through the sides of the panels to secure the top and bottom slats in place.
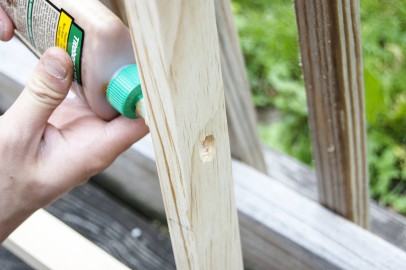
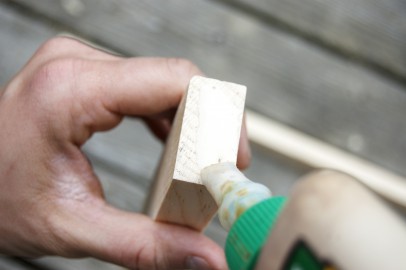
Step 6: Put a little wood glue in each dowel hole then stick one end of a dowel through its hole just far enough for you to be able to get the opposite side in place. Make each end flush with the sides of the panel and twist the dowel in place to distribute the glue around the entire dowel.
Step 7: Wipe away any excess wood glue with a clean, lint-free cloth.
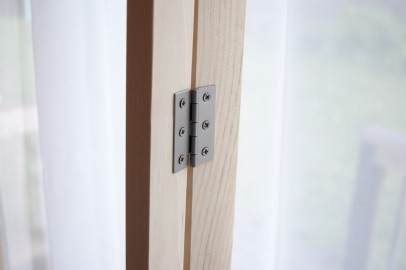
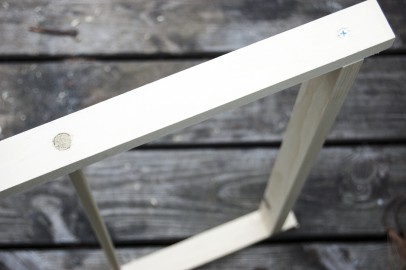
Step 8: Measure and mark where you want to put your hinges then screw them in place.

Step 9: With the frame standing upright, paint or stain it as desired. After it has dried, if you want to lay it flat you can paint or stain the feet. And you’re done with the frame!
Part 2 – Adding the macramé
Step 1: Figure out how long you need your macramé cord to be by doing a test run and adjusting from there. The best length for mine was about 43” per strand, but you may need more or less depending on the thickness of the cord, the size and type of your knots, and the amount of distance you need to cover.
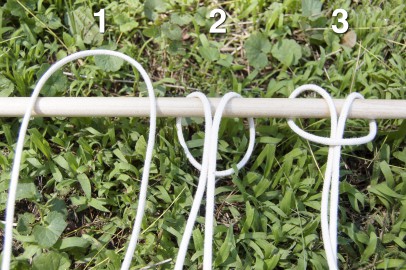
Step 2: Tie two pieces of cord onto a dowel by following the above photo: with the string bent in half, loop it over the top of the dowel then bend it underneath. Send the ends of the cord through that loop then pull it tight. Each section of macramé is made up of two pieces of cord which, since they’re bent around the dowel, create four hanging strands. The middle two strands of those four will remain stationary so you can allow those to be shorter. I adjusted mine so the middle two were just long enough for me to tie a knot with around the wooden slat and used the extra length on the outer strands for knot-making.
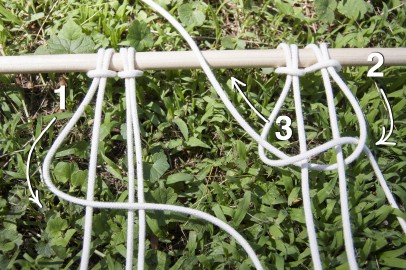
Step 3: Create your first knot by following the above photo: take the left outer strand and cross it over the other three strands. Bend the right outer strand over that then behind the two middle strands and through the loop you just created on the left side. Pull the two outer strands to your desired tightness. If you close the knot all the way, your macramé will end up looking like a twist. I left mine open a little for a pattern that sort of mimics the lace.
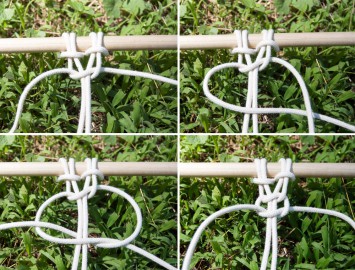
Step 4: Continue to do this same knot over and over again until you are almost at the bottom slat of wood. If you find that your macramé is twisting (this is called a spiral knot), try alternating which strand (the right-outer or the left-outer piece) you start your knot with. When you alternate it’s called a square knot, so google it if you’re running into trouble!
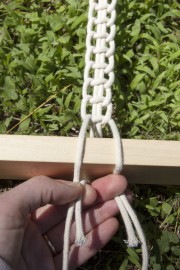
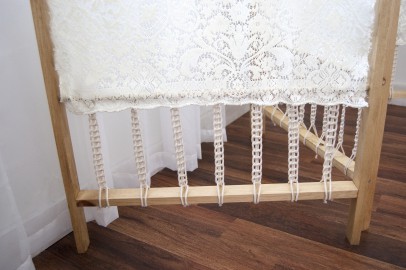
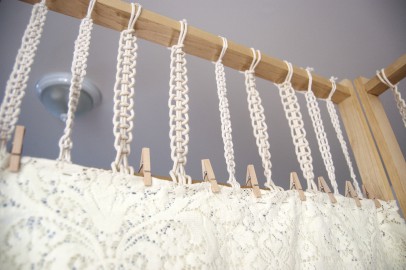
Step 5: When you reach the end, wrap the outer two strands over the wood and the inner two behind the wooden slat.
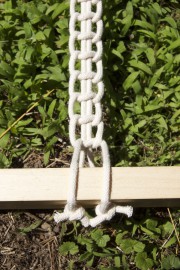
Step 6: Tie two very tight knots around the wood to hold the cords in place. Trim the knots as close to the wood as you feel comfortable, but be careful not to trim so closely that the knots come undone. For a fancier finish, try adding beads or tassels. Continue to add the macramé to the top and bottom sections of each panel, always starting on the dowel and tying under/over the wooden slats (so the knots are hidden better at the top and bottom of the frame). I did all of the bottom sections first then flipped the frame upside down to do the top. Phew—congratulations on finishing part two!
Part 3 – Adding the fabric
Step 1: Lay your ironed (if necessary) fabric flat then measure, mark, and cut it into thirds. Remember to triple check your sizing before you make any cuts! I left my fabric taller than it needed to be so I could have a little drape folded over at the top for interest. You don’t have to do this if you don’t want to (if you do, account for the extra fabric in your measurements!). You could also accomplish this same idea by adding fringe, pompoms, or more macramé in its place instead.
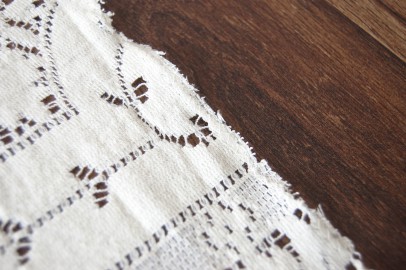
Step 2: Use Fray Check seam sealant or your sewing machine set to a zigzag stitch to secure the edges you’ve cut. Depending in your fabric, you may want to fold the fabric over and actually straight-stitch it into place to prevent fraying. Another option would be to finish the edges with bias tape. It’s all up to you, your fabric, and your decor style!
Step 3: If you’re going with the folded method that I use, measure and pin the fold into place. If you’re choosing to add a different type of accent, now’s probably the time!
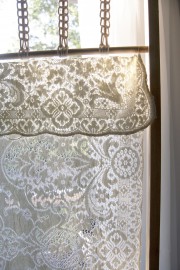
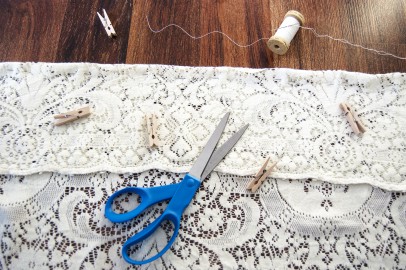
Step 4: Make sure that all of your macramé is evenly spaced and adjusted the way you want it to be. One panel at a time, use clothes pins to secure a fabric panel to the dowel temporarily. If your fabric has a large scale pattern (mine does and you can see what I mean in the first photo of this section and the very last) or a front and a back, make sure the three panels are put in the right places and facing the right direction.

Step 5: Thread a tapestry needle with sturdy coordinating thread and knot it around a top dowel on one end where it meets the side of the frame. Hand-stitch the fabric onto the frame by sewing through the fabric then through the macramé cords all the way across the dowel. Remove straight pins and clothes pins as you go and tie the thread again around the dowel when you reach the other end.
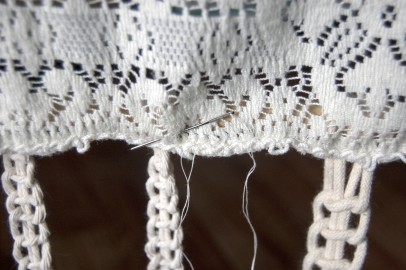
Step 6: To secure the bottom of the fabric, you’re doing essentially the same thing except that I chose to have my fabric overlap the dowel to show off the fancy edging. That’s your call, though! Just make sure it’s secured well enough and you’re good to go!
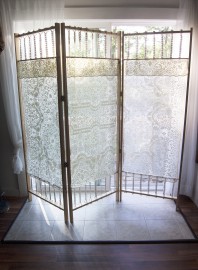
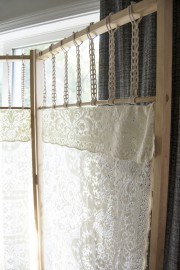
Now you’ve got the perfect privacy screen for blocking prying eyes without shutting out that golden summer sunshine. I couldn’t get a good photo of it set up in our bedroom because the room is so narrow that I couldn’t get far enough back, but it looks pretty good even in my living room! A room divider like this can also be really helpful in creating a distinct space within a larger room which can also be great for shared apartments or an office space that’s located on one side of a living area. No matter how you use it, I hope you’ll enjoy this dreamy new decor piece!